The Photos Ti Kuih is Aunty Yean's proof of sheer hard work. As she busily prepares this Nyonya Delightful Ti Kuih with banana leaf lined in rattan basket or condensed milk tins, I caught all the photos ti kuih.
To cope with the orders, she meticulously prepared at least 4 to 5 different sets of work stations and at her age, one can only marveled at her effective planning.
The traditional Thnee Kuih is generally made using banana leave lined tin. That is not all, most of our kuih (cakes) uses banana leaf, coconut and fresh rice or glutinous flour.
Here are Photos Ti Kuih. Aunty Yean has been making Ti Kuih for over 30 years, over 25 kilos of rice flour per three days. Without calculating sugar and time and effort, it is definitely sheer hard work to produce 120 pieces every three days.
Soaking the rice and grinding
- Soaking the rice and grinding
- Cleaning and lining the tins
- Mixing the batter
- Steaming the Kueh Bakul
A step by step advise given by Aunty Yean. This process from soaking to drying out is a three day work.
- Soaking the rice till it softened 6 to 8 hrs. When pressed with two fingers, it should break to pieces then it is ready for grinding.
- Grinding and sieving the wet rice. If you use blender, please grind till it is really fine then sieve. Repeat process if not fine enough.
- Press with a heavy object to extract the water, keep turning and repeat every 2 hours. You can only use it when it is really dried out.
 Photos Ti Kuih: Soaking the rice. |
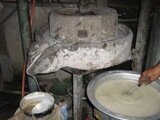 Grinding and sieving the wet rice. |
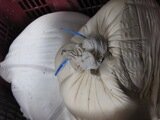 Press down to dry out the water. |
Cleaning and lining the tins
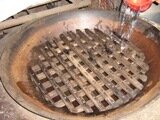
Washing, wipe dry and basking over a fire stove all initial works before lining the tins for steaming Kueh Bakul or Ti Kuih.
A Washing lady anyone! Aunty Yean needs part time washing lady. It is not too bad as every trainee starts from the lowest job. But one must be able to wash, dried, lined 150 tins daily for 2 months.
- Use softened banana leaves to line the basket or tins. To soften the leaf, basked over fire or gas stove.
- Watch how Aunty Yean finger moves as she lines the tins. 3 layers of banana leaf is advisable. Cut a round piece for center.
- The aroma from the steamed rattan and banana leaf is what makes our Ti Kuih so special and different.
 Use softened banana leaves to line the basket or tins. |
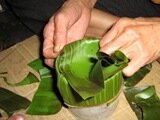 Watch how Aunty Yean finger moves as she lines the tin. |
 Photos Ti Kuih: Lined using Steamed Banana leaves. |
Mixing the batter
You would think that after grinding, you can use immediately, right? The grinned rice flour has to stand out overnight before use. Medium dry rice flour can only be mixed with coconut milk and sugar.
This will help to achieve the crispiness and freshness for some time. This process needs you to have a good feel.
Your five sense comes in here, as the lumpy flour must break easily to be considered ready for use. Only then can sugar be added.
This process also need strong wrist to fold till all sugar melts. Approximately every 5 kg flour, 1 hour blending the batter.
- If the flour is dried enough, it breaks easily. If not, leave for another 2 hrs. Break to pieces and blend with sugar.
- Blend with sugar till all becomes runny. Ratio 1 kg wet flour to 1 kg sugar or to taste. Check the consistency of mixture.
- Use tap water ,fill up till it touches the stand. Checking and filling water is important. Do not allow to dry out.
 The flour will breaks easily if dried enough. |
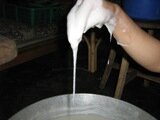 Check the consistency of mixture. |
 Photos Ti Kuih: In steamer, always have enough water. |
Steaming the Kueh Bakul
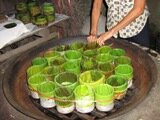
Preparation for steaming the sweet dessert can take hours. 4 layers of lined tins filled with the rice flour and sugar batter is poured in.
Hands must be steady to fill even height for every tin. Once all tins are filled, covered and sealed before lighting firewood.
- Lined tins and tie them tightly. Maximum 3 layers. Gas Stove 2 layers if your tray or cover is high enough.
- Stir the mixture well before filling all the tins with sugar and flour mixture. 1 kilo can fill 2 to 3 milk cans.
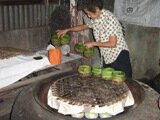
- Cover well with a layer of cloth and stand. Close lid, place a cloth tightly round the lid. Filling water by sipping thru the lid.
- The maximum layers one can stack is 3 layers. Slowly pour water in by removing the cloth outside the lid.
- The firewood is preferred. If you want to use gas stove, keep the fire burning low and consistently.
- Start the fire after lid is close. Check fire and water every hour till cooked 14 to 16 hrs cooking time.
 Photos Ti Kuih: Lined tins and tie them tightly. |
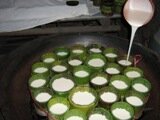 Stir the mixture well before filling all the tins. |
 Photos Ti Kuih: Cover well with a layer of cloth and stand. |
Checking water
Every hour or two after it starts steaming, Aunty Yean checks to ensure the water does not dry out. So our 'wonder aunty' sleeps with one eye open.
Round the clock till morning. She usually starts her steaming in the evening and by mid morning, the fire will be put off.
Taking the cool kuih out and leaving it for a day or two before one can buy so it wont be too soft. So for those who buys freshly cooked ti kuih, it will be soft.
If you are buying for prayers, leave it to dry out for another day or so. For those like me, who enjoys eating the soft ones, get grated young coconut dashed with a little salt, roasted teel seed and it is yummy.
 The maximum layers one can stack is 3 layers. |
 Sealed with cloth so no vapors dropped on surface of Ti Kuih. |
 Photos Ti Kuih: Start the fire after lid is close. |
Believe it or not, it is true. People in this trade will not allow you near their house when they are making it. They will vouch that Ti Kuih will not cook if a person who is 'mourning' enters the house. Also, it is taboo to ask things like:
- Really cannot cooked if these mourning people enter?
- What time will this kuih be cook?
- Why so white?
In short, sealed your lips when you walked into houses making Ti Kuih.
Go to Top of Photos Ti Kuih Page
Back to Step by step to making Kuih Kapit Page
Back to step by step making Jam puffs page
Back to My Island Penang Home Page